Wednesday, August 18, 2010

A chicken, pt 1: Rolled breast with bacon and mushroom

I was inspired by a recent pressure test elimination challenge on Masterchef Australia to buy a chicken the other day. I wanted to try the technique described in the recipe at the bottom of this post.

Cold, I thought, the chicken portion would make a nice dish to pack in my bento box for lunch. I modified the recipe considerably, using bacon to line the chicken skin, and a mushroom mixture to stuff the breasts, a) because I don't happen to have any truffles lying around in the kitchen, and b) because I can't actually taste truffles!

A couple of mushrooms and some of my home-cured bacon:


I sliced some of the bacon very thinly …


… and cooked it off in a warm frypan. I wanted them to stay soft.


While the bacon was cooking I chopped the mushroom sand some garlic …


… which I put in the bacon pan when it was cooked …


… leaving it to cook in the bacon fat.


I ventured out into the garden to find a nice bit of sage …


… which I chopped finely and added to the mushrooms.


The chicken:


Following the instructions in the recipe I started on one side …


… and then the other, until it was completely peeled:


Cutting off the breasts was a piece of cake.

I had some little rips by the wing-holes …


…  but I easily managed to cut a bit of whole skin into a rectangle of the proper size:


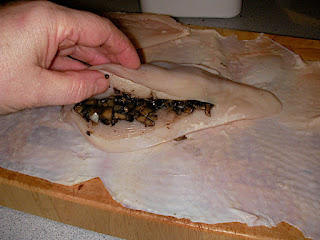
Next job was to cut pockets in the breasts …


… , season the skin and the chicken with salt, and stuff the breasts with the cooked and seasoned mushroom mixture:


I arranged the bacon slices on my chicken skin …


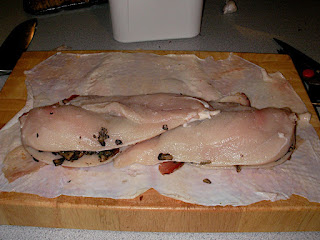
… then the chicken breasts on top of the bacon. I had removed the tenderloins from the breasts, and I used one of them to fill in the skinny bit where the two pointed ends of breast overlapped:


Rolling the breasts up tightly in the chicken skin was easier than I had expected, and I didn't do it quite the way the recipe suggested …


… I rolled it up in plastic wrap after I'd rolled the breasts in the skin instead of at the same time:


The chicken went into the 64°C waterbath in which I was also incubating some cottage cheese:


The recipe said 68°C, but my low temp sous-vide instructions recommend 64°C for chicken breast so that's what I used.

After 40 minutes I pulled it out:


And left it to rest and cool for half an hour or so before slicing it into eight portions …


… plus two funny-shaped end bits that went straight into my mouth. It's good. Beautifully moist and very flavourful. And rather professional looking too, I thought.

Recipe from Masterchef Australia:

Free Range Chicken cooked with Truffle and Early Spring vegetables
by Peter Gilmore

25g black winter truffle, scrubbed with a brush and cloth
100g unsalted butter
1 x No 16 free range chicken
6 baby leeks, trimmed
6 red marble onions, trimmed
6 spring onions, trimmed
12 small cherry bell radishes, trimmed
12 small French breakfast radishes, trimmed
2 pink turnips, trimmed
6 baby white turnips, trimmed
125g fresh peas, shelled
16 pea flower shoots
8 society garlic flowers
6 okra sprouts
Garlic cream

500ml milk
2 garlic cloves, roughly chopped
6gms agar agar powder
 

1. Set temperature controlled water bath to 68 degrees C. Preheat oven to 180 C.
2. Finely grate 10g of the truffle with a microplane and add 70g of unsalted butter. Season to taste with sea salt and set aside.
3. To prepare the chicken place the chicken on a chopping board with the backbone facing up. With a sharp knife cut the skin lengthways down the backbone. Using your hands gently ease the skin from the chicken, going around the legs first and pulling the skin to the top of each leg. With a sharp knife cut the skin from the leg leaving only the smallest hole. Continue to remove the skin using your fingers from around the breast and pull back the breast until you reach the wing tips. Pull the skin back over the wing tips as far as possible using a sharp knife to cut and release the skin from the wing tips. Reserve the skin then remove the breasts from the bird and reserve.
4. Trim the skin into a large oblong cutting off any rough edges. You should have an oblong approximately 30cm x 24cm. Remove any excess fat from the skin with a sharp knife being very careful not to break the skin surface. Remove the chicken skin from the board and spread out a long length of cling film on the work surface approximately 45 cm wide and 70 cm in length. Place the chicken skin on top of the plastic up from the bottom edge.
5. Place 8 thin slices of truffle across the top two thirds of the chicken skin. Place the two chicken breasts slightly overlapping in the centre with the two point ends meeting on the bottom third of the chicken skin. Open up the fillet on each breast and with a knife make a small incision down the length of each breast being careful not to cut through the breast. Place the softened truffle butter into a piping bag and pipe half of softened truffle butter down the length of each incision and fold the fillets over the butter.  Begin to roll the chicken breasts in its skin until it is rolled into a cylinder.
6. Roll the chicken in the prepared cling film sheet tightly to give you at least 5 layers of plastic around the chicken. Tighten each end of the excess plastic by holding as you roll to form a sausage shape. Now roll in a second layer of cling film just as you have done before. Tie a tight knot in each end of the plastic. Place in the fridge to rest. Submerge the chicken into the preheated water bath for about 40 minutes.
7.  To make the garlic cream, heat the milk in a small saucepan until simmering. Add the garlic and allow the milk to gently simmer for 1 minute, remove from the heat and allow to cool. Strain the garlic from the milk.  Bring the milk to a simmer and add  the agar agar. Whisk in well and simmer for a further 1 minute. Season to taste with sea salt and allow to cool completely on ice.
8. Remove the chicken from the water bath and allow to rest for 5 minutes. Meanwhile reheat the garlic cream by whisking over a low heat, add some additional milk if necessary and place in a squeeze bottle. Keep warm. Cook all the vegetables in boiling salted water starting with the leeks and onions, then add the radishes, turnips and peas. Cook until tender. Drain and dress with the remaining 30g of melted unsalted butter. Season with sea salt. Remove the chicken from its plastic wrap and slice into 4. If the chicken hasn't completely cooked through, place in the oven for a couple of minutes.
9. To serve, arrange two slices of chicken, vegetables and garlic cream on each serving plate. Garnish each chicken slice with 1 additional slice of truffle and garnish the plate with some pea and garlic flowers and okra sprouts. Serve immediately.

Sunday, August 15, 2010

Shepherd's pie

I love shepherd's pie. I've been known to buy a lamb or hogget roast just so I could leave it to go cold after cooking it and make shepherd's pie from it.

This is why I bought a largeish bit of hogget leg from which to make mutton pies.


I put the bit of meat I hadn't used in a pyrex oven dish and into the oven to roast while I was preparing and cooking the pies:


 This is how it looked when the pies went in:


Then I boiled some potatoes to mash:


When the meat was done …


… I cut the meat off the bone and put it and an onion through the mincer, …


… I poured the cooking fat from the oven dish …


… and made some gravy from the pan juices by adding water and a bit of flour then cooking it off in the microwave:


The gravy went into the minced meat along with salt and pepper and a good squeeze of tomato ketchup:


Once it was all mixed up …


… I spread out out in the washed oven dish …


… then started on the potatoes. I drained them, dried them by shaking the pot on on the burner, added a nice hunk of butter and a bit of milk, then mashed them. Shepherd's pie looks nicer with lovely white peeled potatoes, but all I had was these purple ones and I like potato skins, so I just left them all in.


The potatoes go on the meat …


… I made a nice sort of basket weave pattern on top with a fork once I'd spread them out:


A few small dabs of butter on top …


… then into the oven to cook …


… until it's piping hot all through and the top is brown and crispy.

This is my comfort food, and the only reason tomato ketchup has for existing.

Mutton pies

Mutton pies are a traditional Scottish food. Dunedin, where I live, was settled by the Scots back in the 1850s and they brought many of their traditions with them, including the mutton pie. They are decreasingly available these days, but when I moved here 25 years ago from the North Island every corner shop had mutton pies in the warmer along with the mince and steak pies I was more used to. That sounds as though I lived on pies! I assure you I didn't. They're jolly good to munch on on your way home from the pub though.

A mutton pie is made with hot water pastry the same way a pork pie is, but they're small and eaten hot. I thought they might be a good way to try out completely hand formed pastry cases. And I can freeze them, no need to get grossly fat by eating them all at once.

I bought a bit of hogget leg from the supermarket:


Hogget is sheep that's older than one year and younger than two. It's tastier and cheaper than lamb, not as fatty as mutton.

I cut off about half of the meat …

… and put it through the mincer …


… before adding salt and quite a lot of pepper …


… and mixing it up thoroughly. I fried of a little bit so I could taste the seasoning and ended up adding more salt and quite a lot more pepper. Mutton pies are peppery.

I made a batch of hot water pastry just as I did for my pork pie last week, saved a quarter for the pie tops, and divided the rest into eight.

Then I made pie shells. It was just like making clay bowls when I was small! Not too difficult at all.


I made eight fairly quickly …


… divided the meat mixture between them …


… then squooshed it out flat …


… before dividing the lip pastry in eight and making eight wee pastry lids …


… which I pinched onto the pies. I cut wee holes in each lid then the pies went in the oven …


… at ~170°C for a bit less than an hour:


I ate one and packaged the rest to freeze. It was OK. Not great, but OK. I have the flavour right, the pastry is right, but the meat was a bit drier than it should be. I think I need to use a cheaper, more gelatinous, cut of meat. Shoulder might have been better, and I'll mix some water into the meat next time too.

Sunday, August 8, 2010

Raised pies

This is another traditional English dish that Darren was missing last week. I'm going to take him a taste, but most of it will end up in my lunches.

I meant to make pork pies, one round and one long with boiled eggs in. My volume estimation was a bit off though, and I ended up making one pork pie and one beef one - good thing I'd bought two lots of the blade steak I used for the potted meat!


Raised pies use a funny sort of pastry made with hot water. Lard is melted in hot water (or water and milk), then it's brought to boiling point …


… and poured into flour with a little salt.


The mixture is worked into a ball, working reasonably quickly because it needs to stay warm. No huge panic though, I discovered that you can re-heat it in the microwave quite successfully.


I cut my ball in half, then cut 1/3 off each of the halves to keep warm and use for lids. I'm nowhere near expert enough to be able to raise a pie by hand, so I covered two dishes with GladWrap and moulded the pastry over them thus:


Then I stuck the in the fridge to set.

While they were cooling down in the fridge, I hard-boiled two eggs, then diced my bit of pork shoulder quite finely, and mixed it with some salt, pepper, a little Cayenne pepper, and a bit of finely chopped thyme from the garden:


Oblong is not the best shape for a free-standing pie! I had to prop up the edges so they wouldn't collapse until I'd filled it. I think I should have made the pastry a bit thicker too.


I packed the meat into the pie, tucking the peeled eggs in the middle, then pressed out the pastry lid …


… and carefully placed it on top of the pie:


I filled the round pie with beef seasoned with salt, pepper, Cayenne, and a bit of anchovy sauce:


I pressed the lids onto the cases firmly, trimmed the ragged bit off, cut little holes in the top (for pouring in jelly when cooked), made some pretty little leaf decorations, and wrapped paper around them so they wouldn't collapse in the oven as they heated up:


Then I brushed their tops with beaten egg and they went into a 200°C oven for 20 minutes, followed by about an hour and a half at 160°C. I took the paper off about half way.

I need a bit more practice at this - despite all my precautions I ended up with some small holes from which cooking juices leaked …


… and one side of the pork pie collapsed. I removed the paper a bit too soon.


And that made filling it with jelly just a tad difficult. I had some pork jelly in the freezer, it was left over from making porchetta di testa at Christmas time. I melted it down and added the cooking juices that had escaped from the pies (I sucked them up with my turkey baster) and let it set again to make sure it would be solid enough:


Then I melted it and very carefully poured it into the pork pie through the collapsed side in several stages, leaving the pie propped at all sorts of angles as the bits of jelly set. I had to plug a few small holes with bits of solid jelly too, but it all worked out quite well in the end:


The slices of pie don't look half bad. And it tastes good too.

I didn't bother putting jelly in the beef pie, so it was a little dry, but tasty.

Recipe

Hot water pastry

Ingredients:
 225g flour
1/2 tsp salt
100g lard
110ml water

Method:
Melt the lard in the water, then bring to boiling point
Mix into the flour and salt, work into a ball.
Use while warm. If it gets too cold and stiff, warm it briefly and carefully in the microwave.